Choosing and Installing the Correct Decoder For Your Locomotive
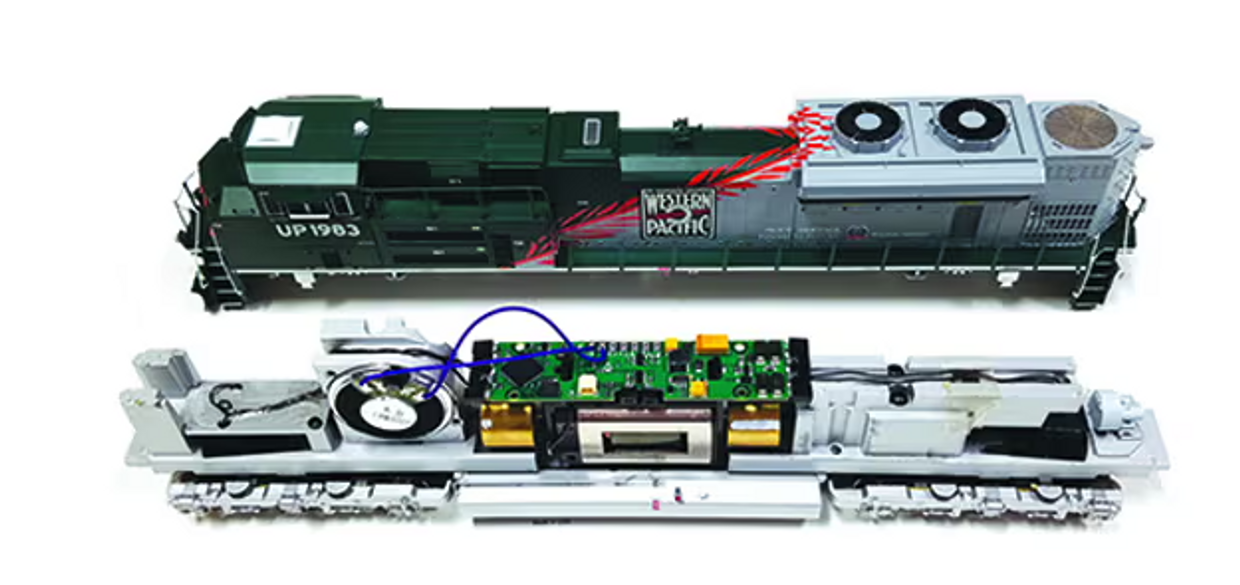
A model railroad decoder is an electronic device used in model trains, specifically those that operate on Digital Command Control (DCC) systems. Its primary function is to receive digital commands from a DCC controller and translate them into actions such as controlling the locomotive's motor speed, direction, lights, and other features.
Here are some key components and functions of a model railroad decoder:
Microcontroller: The core component of the decoder is a microcontroller, which processes the digital commands received from the DCC system and controls the various functions of the locomotive.
Motor Control: Decoders regulate the speed and direction of the locomotive's motor based on the commands received from the DCC controller. This allows precise control over acceleration, deceleration, and speed steps.
Lighting Control: Many decoders also manage lighting functions such as headlights, taillights, ditch lights, and interior cabin lights. They can be programmed to simulate realistic lighting effects, such as dimming or flickering.
Sound Generation (Optional): Some decoders include sound capabilities, allowing model railroaders to add realistic locomotive sounds such as engine revving, whistle blowing, and bell ringing. These decoders typically have built-in speakers or support external speakers.
Accessory Control (Optional): Advanced decoders may have outputs for controlling additional accessories such as couplers, smoke generators, or animation devices.
Addressing and Programming: Decoders are assigned unique addresses on the DCC system, allowing modelers to control multiple locomotives independently. They can be programmed to respond to specific commands and to adjust various settings such as acceleration, deceleration, and lighting effects.
Feedback and Monitoring (Optional): Some decoders support feedback features that provide information about the locomotive's speed, direction, and other parameters back to the DCC system for monitoring and automation purposes.
Decoders come in various sizes and configurations to fit different types of locomotives and scales. They are typically installed within the locomotive's chassis or tender, connected to the motor, lights, and other components. Proper installation and programming of the decoder are essential to ensure smooth operation and realistic performance of the model train on the layout.
Choosing and installing decoders in model railroads can significantly enhance the functionality and realism of your trains. Here's a step-by-step guide to help you through the process:
- Selecting the Right Decoder:
- Locomotive Compatibility: Ensure that the decoder you choose is compatible with your locomotive model and scale. Some decoders are designed for specific manufacturers or locomotive types.
- Functions: Consider the functions you want the decoder to control. Basic decoders typically handle motor control and lights, while more advanced ones can manage sound, lighting effects, and additional features like smoke generators or coupler operation.
- DCC Compatibility: Confirm that the decoder is compatible with Digital Command Control (DCC), which is the most common control system for model railroads.
- Decoding the Locomotive:
- Access: Open up the locomotive's shell or casing to access the motor and lights. This usually involves removing screws or clips.
- Motor Wires: Identify the wires connected to the motor. These are typically two wires, one for each terminal of the motor.
- Lighting Wires: If applicable, identify the wires connected to the headlights and other lights on the locomotive.
- Installing the Decoder:
- Motor Connections: Connect the decoder's motor output wires to the terminals of the locomotive's motor. Ensure that you connect the wires to the correct terminals to avoid damaging the decoder or the motor.
- Lighting Connections: If your decoder controls lights, connect the appropriate wires to the headlights and other lights according to the decoder's instructions.
- Speaker (if applicable): If your decoder includes sound capabilities, connect the speaker to the decoder following the provided instructions.
- Insulation: Insulate the connections with heat-shrink tubing or electrical tape to prevent short circuits.
- Programming the Decoder:
- Addressing: Assign a unique address to the decoder so that you can control it independently on your DCC system. This address allows you to command the locomotive to move, control lights, and trigger other functions.
- Function Mapping: If your decoder supports multiple functions (e.g., lights, sound effects), you may need to map these functions to specific keys or buttons on your DCC controller.
- Testing and Adjustment:
- Testing: Test the locomotive on your layout to ensure that the decoder is functioning correctly. Verify motor control, lights, and any other features you've installed.
- Adjustment: Fine-tune the decoder settings as needed to achieve the desired performance and effects.
- Closure: Once everything is installed and working correctly, reassemble the locomotive and secure the shell or casing.
- Optional Enhancements: Depending on your preferences and the capabilities of your decoder, you may explore additional features such as customized sound effects, lighting effects, or other accessories to further enhance the realism of your model railroad.
Always refer to the specific instructions provided with your decoder and locomotive for detailed guidance, as the installation process can vary based on the models and brands involved. Additionally, if you're new to decoder installation or feel unsure about any step, consider seeking assistance from experienced model railroaders or professionals.
Photo Courtesy of Soundtraxx
Recent Posts
-
Capturing History in Miniature: The Art of Prototype Modeling in the Model Railroad World
Prototype modeling in the model railroad world involves creating miniature replicas of real-life tra
-
Unveiling the Imaginative World of Fictional Railroads: Where Creativity Meets the Rails
Model railroading has long been a hobby rooted in historical accuracy and meticulous attention to de
-
Creating Your Model Railroad: Step-by-Step Guide to Laying Track
Model railroading is a fascinating hobby that allows enthusiasts to recreate miniature worlds of rai


