Railroad Realms: Navigating the Tracks of Intermediate Model Railroading Part 4: Mastering Scenery Realism Techniques
In the fourth installment of our series on advanced model railroading, we delve into the art of creating realistic landscapes that breathe life into your layout. From majestic mountains to meandering rivers and bustling urban scenes, this guide offers detailed insights and techniques to elevate your scenery realism to new heights.
1. Crafting Realistic Landscapes:
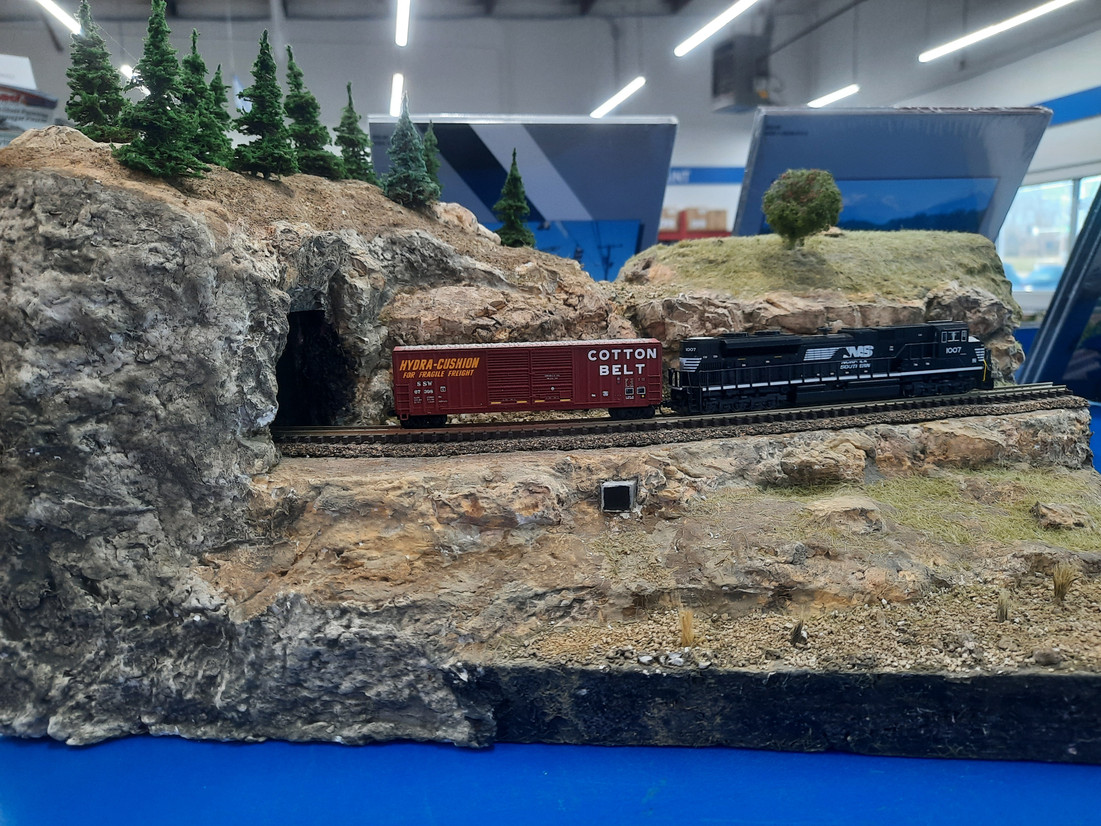
Transform your layout with breathtaking landscapes that captivate the imagination. Learn the secrets behind crafting realistic mountains, including techniques for sculpting terrain contours, applying textured surfaces, and painting intricate rock formations. Discover how to simulate the natural flow of rivers and streams, incorporating techniques for creating water effects, adding realistic vegetation along the banks, and achieving convincing water transparency.
Creating realistic terrain is essential for bringing your model railroad layout to life. Terrain sculpting allows you to craft lifelike landscapes, from rugged mountains to rolling hills. In this tutorial, we'll explore step-by-step instructions for terrain sculpting that will elevate the realism of your model railroad scenery.
Materials You'll Need:
- Foam board or insulation foam sheets
- Hot wire foam cutter or utility knife
- Plaster cloth or paper towels
- Sculpting tools (such as spatulas and brushes)
- Acrylic paints
- Woodland Scenics or similar terrain texturing materials
- Static grass applicator
Planning Your Terrain
Before you begin sculpting, plan the layout of your terrain. Consider the overall theme and geography of your model railroad, including the placement of mountains, valleys, rivers, and other natural features.
Cutting and Shaping Foam
Using foam board or insulation foam sheets, cut out the basic shapes of your terrain using a hot wire foam cutter or utility knife. Stack and layer the foam to create varying elevations and contours.
Carving and Shaping
With your foam pieces stacked and secured, use sculpting tools to carve and shape the terrain to your desired form. Create slopes, ridges, and valleys to mimic natural landscapes.
Applying Plaster Cloth
Once you're satisfied with the shape of your terrain, apply plaster cloth or dampened paper towels over the foam surface. Smooth out the cloth or towels to create a seamless covering, ensuring all foam edges are covered.
Texturing the Terrain
After the plaster cloth has dried, apply texture to your terrain using acrylic paints and terrain texturing materials. Use a variety of earth-tone colors to mimic the natural hues of soil, rocks, and vegetation.
Adding Vegetation
Enhance the realism of your terrain by adding vegetation. Use static grass applicators to apply grass and foliage to the terrain. Experiment with different lengths and colors of static grass to achieve a natural look.
Detailing and Weathering
Add final details to your terrain, such as rocks, bushes, and trees. Weather the terrain using dry brushing techniques with lighter and darker shades of paint to add depth and realism.
Integrating into Layout
Once your terrain is complete, integrate it into your model railroad layout. Secure the terrain in place using adhesive, and blend the edges with surrounding scenery using ground cover materials.
Finishing Touches
Add finishing touches to your terrain, such as water effects for rivers and streams, or miniature figures and structures to bring the scene to life.
By following these steps, you can create realistic terrain for your model railroad layout that enhances the overall realism and visual appeal of your scene. Experiment with different techniques and materials to achieve the desired effect, and enjoy bringing your model railroad landscape to life with terrain sculpting!
2. Creating Vibrant Urban Scenes:
Immerse yourself in the hustle and bustle of urban life with vibrant city scenes. Explore methods for constructing realistic buildings, from scratch-building techniques using styrene sheets to detailing pre-made structures with weathering effects and intricate architectural features. Dive into the world of urban planning, mastering techniques for creating bustling streets, incorporating realistic signage and advertisements, and adding depth to your cityscape with backdrops and forced perspective.
Urban scenes add depth and character to your model railroad layout, capturing the essence of bustling city life. From towering skyscrapers to bustling streets, this how-to guide will walk you through the steps of creating vibrant urban scenes that bring your model railroad layout to life.
Materials You'll Need:
- Styrene sheets or cardboard for building structures
- Craft knives and scissors
- Scale model windows and doors
- Paints and brushes
- Weathering powders or chalks
- Miniature figures and vehicles
- Adhesives (such as super glue or plastic cement)
Planning Your Urban Layout
Before diving into construction, plan the layout of your urban scene. Consider the placement of buildings, streets, sidewalks, parks, and other features. Sketch out a rough layout to guide your construction process.
Building Structures
Using styrene sheets or cardboard, cut out the basic shapes of your buildings using craft knives and scissors. Create walls, floors, and roofs, ensuring they are scaled appropriately to fit your model railroad layout.
Adding Details
Once the basic structures are in place, add details such as windows, doors, and architectural features. Use scale model windows and doors to enhance realism. Experiment with different building styles and designs to create variety in your urban scene.
Painting and Weathering
Paint the buildings using acrylic paints, adding realistic colors and textures. Use weathering powders or chalks to add age and character to the buildings, simulating effects such as rust, grime, and weathered paint.
Creating Streets and Sidewalks
Construct streets and sidewalks using styrene sheets or painted cardboard. Add details such as crosswalks, manhole covers, and street signs to enhance realism. Incorporate green spaces and parks to break up the urban landscape.
Adding Vehicles and Figures
Enhance the vibrancy of your urban scene by adding miniature vehicles and figures. Place cars, trucks, buses, and other vehicles on the streets, and populate sidewalks with pedestrians, cyclists, and other figures.
Blending with Surrounding Scenery
Integrate your urban scene into the surrounding scenery of your model railroad layout. Use ground cover materials to blend the edges of buildings and streets with natural landscapes. Add foliage, bushes, and trees to soften the transition between urban and rural areas.
Lighting and Effects
Consider adding lighting effects to your urban scene to enhance realism. Use miniature street lamps, traffic lights, and building lights to simulate the glow of a bustling city at night.
Final Touches and Details
Add final touches and details to your urban scene, such as signage, billboards, graffiti, and other urban elements. Pay attention to small details that add authenticity and character to your layout.
By following these steps, you can create vibrant urban scenes that add depth, realism, and character to your model railroad layout. Experiment with different techniques and materials to bring your urban landscape to life, and enjoy the dynamic energy of a bustling cityscape on your model railroad.
3. Exploring Materials for Ground Cover and Foliage:
Enhance the realism of your scenery with a diverse range of materials for ground cover, trees, and foliage. Discover the versatility of ground cover materials such as static grass, turf, and ground foam, and learn how to layer and blend them to create naturalistic textures and colors. Explore different methods for crafting trees and foliage using a variety of materials, including static grass applicators, foliage clusters, and realistic tree armatures.
Ground cover and foliage are essential elements in creating realistic scenery for your model railroad layout. From lush meadows to dense forests, this guide explores various materials and techniques for achieving lifelike ground cover and foliage effects.
Materials You'll Need:
- Static grass and applicator
- Ground foam and turf
- Woodland Scenics or similar scenery materials
- Scenic glue or diluted white glue
- Foliage clusters and trees
- Fine turf and ground cover materials
- Paints and brushes
Understanding Ground Cover Materials
Before selecting materials, understand the different types of ground cover available. Static grass creates realistic grassy areas, while ground foam and turf mimic bushes, shrubs, and forest floors. Fine turf and ground cover materials add texture and variety to the landscape.
Applying Static Grass
Use a static grass applicator to apply static grass to your layout. Apply a thin layer of scenic glue or diluted white glue to the area where you want to add grass. Hold the applicator above the glue-covered area and shake gently to disperse the static grass fibers. Allow the glue to dry completely before handling.
Using Ground Foam and Turf
Apply ground foam and turf to create bushes, shrubs, and forest floors. Apply a thin layer of scenic glue or diluted white glue to the desired area, then sprinkle ground foam or turf over the glue. Press lightly to secure the material in place. Experiment with different colors and textures to create depth and variety in your scenery.
Incorporating Foliage Clusters and Trees
Add foliage clusters and trees to enhance the realism of your scenery. Use scenic glue or white glue to attach foliage clusters to your layout. Arrange clusters in groups to create natural-looking vegetation. For trees, secure them in place using a small amount of glue applied to the base of the tree trunk.
Blending Materials
Blend different ground cover materials to create realistic transitions between terrain types. Mix fine turf with ground foam and static grass to create textured and varied landscapes. Experiment with different combinations to achieve the desired effect.
Adding Texture and Detail
Once the ground cover is in place, add texture and detail to enhance realism. Use paints and brushes to add highlights and shadows to the terrain. Dry brushing with lighter and darker shades of paint can add depth and dimension to the landscape.
Finishing Touches
Add finishing touches to your scenery, such as fallen leaves, rocks, and other natural elements. Scatter small details throughout the landscape to create visual interest and realism.
By exploring various materials and techniques for ground cover and foliage, you can create realistic and immersive scenery for your model railroad layout. Experiment with different materials and combinations to bring your landscape to life, and enjoy the beauty of a lifelike natural environment on your model railroad.
4. Structuring Realistic Infrastructure:
Elevate the authenticity of your layout with realistic infrastructure and structures. Explore techniques for weathering and detailing buildings to add character and depth, from applying realistic paint finishes to adding weathering powders and graffiti decals. Learn how to incorporate structural elements such as bridges, tunnels, and overpasses seamlessly into your landscape, blending them with surrounding scenery for a cohesive and immersive experience.
Structures and infrastructure play a crucial role in creating a realistic and immersive model railroad layout. From bridges to tunnels and everything in between, this guide explores techniques for structuring realistic infrastructure that enhances the authenticity of your model railroad scene.
Materials You'll Need:
- Styrene sheets or plastic building kits
- Scissors or craft knives
- Plastic cement or super glue
- Paints and brushes
- Weathering powders or chalks
- Woodland Scenics or similar detailing materials
Planning Your Infrastructure
Before constructing any structures, carefully plan the layout of your infrastructure. Consider the placement of bridges, tunnels, overpasses, and other structural elements in relation to the overall layout and scenery.
Building Bridges and Tunnels
Construct bridges and tunnels using styrene sheets or plastic building kits. Cut out the basic shapes of your structures using scissors or craft knives, then assemble them according to the manufacturer's instructions. Use plastic cement or super glue to secure the pieces together.
Adding Detail and Texture
Once the basic structures are assembled, add detail and texture to enhance realism. Use paints and brushes to add weathering effects, rust, and grime to simulate wear and tear. Experiment with weathering powders or chalks to add depth and dimension to your structures.
Integrating into the Layout
Integrate your structures into the layout by securing them in place using adhesive. Ensure that bridges and tunnels are securely attached to the scenery to prevent movement during operation. Blend the edges of the structures with surrounding scenery using ground cover materials and foliage.
Detailing and Weathering
Add final details to your infrastructure, such as signage, lights, and other architectural features. Pay attention to small details that add authenticity and character to your scene. Use weathering powders or chalks to add final touches of realism to your structures.
Incorporating Structural Elements
Incorporate structural elements such as supports, beams, and girders to add realism to your infrastructure. Use plastic or styrene strips to create realistic-looking supports for bridges and overpasses. Experiment with different materials and techniques to achieve the desired effect.
Final Touches
Add final touches to your infrastructure, such as graffiti, posters, and other urban elements. Scatter small details throughout the scene to add visual interest and enhance realism. Experiment with different materials and techniques to bring your infrastructure to life.
By following these steps, you can structure realistic infrastructure that enhances the authenticity of your model railroad layout. Experiment with different materials and techniques to bring your structures to life, and enjoy the dynamic energy of a bustling railroad scene on your model railroad.
With the techniques and insights provided in this guide, you'll be equipped to transform your model railroad layout into a breathtaking masterpiece of scenery realism. From rugged mountain ranges to bustling city streets, each element comes to life with authenticity and detail, creating an immersive world that captivates the senses. Stay tuned for the next installment in our series as we continue to explore the intricacies of advanced model railroading. All aboard for a creative journey into the realm of scenery realism!
Recent Posts
-
Weighting Freight Cars for Better Performance: NMRA Standards, Practical Methods, and Tracking Tips
Weighting Freight Cars for Better Performance: NMRA Standards, Practical Methods, and Tracking Tips
-
Metal vs Plastic Wheelsets: Pros, Cons, and How to Choose the Right Upgrade for Your Model Railroad
Metal vs Plastic Wheelsets: Pros, Cons, and How to Choose the Right Upgrade for Your Model Railroad
-
Weathering Rolling Stock for Realism: Practical Model Train Weathering Techniques That Look Like the Prototype
Weathering Rolling Stock for Realism: Practical Model Train Weathering Techniques That Look Like the


